How we share the app state data between windows in the Akiflow Electron desktop app
Akiflow is a productivity tool shipped on desktop as an Electron multi-window app.
It consolidates all your tasks and calendars from different tools (Gcal/email/Slack/Asana/etc.) in a single view. It has a clean and familiar interface and Superhuman-like shortcuts.
A feature that our users particularly appreciate is that our desktop app has, along with the main window, two separate windows, one for the tray menu, and one for our smart command bar. The smart command bar lets them quickly perform actions on their tasks, such as planning or editing the currently selected task(s). Behind the curtains, we also have a background window that takes care of some heavy lifting.
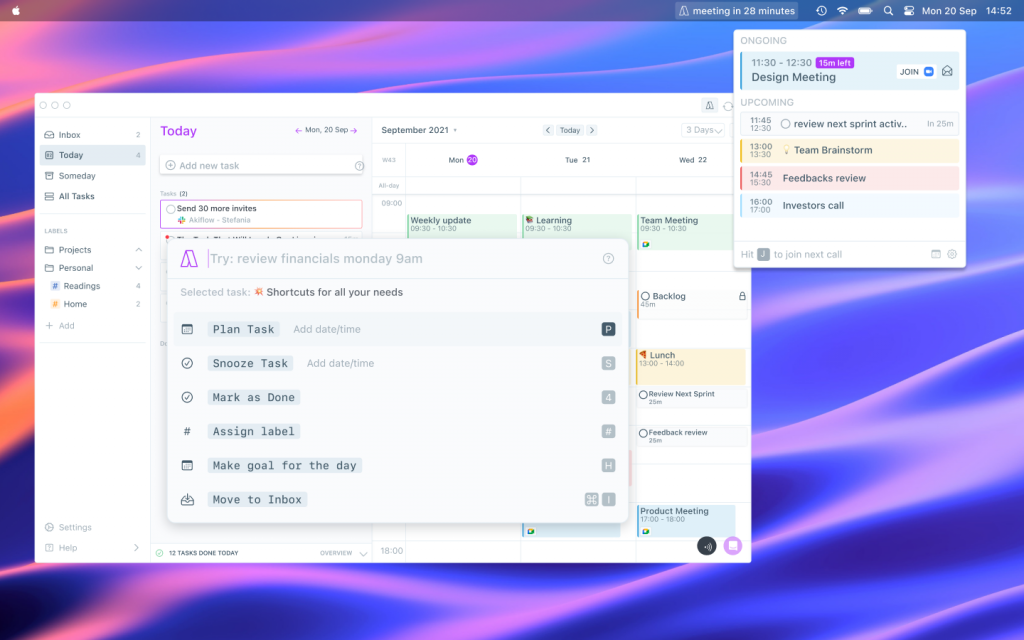
From a technical point of view, a great benefit of having multiple windows is that we have multiple processes running in parallel. So, for example, blocking actions can be delegated to the background window, which is a separate process and so it won’t block the UI.
The problem of having multiple windows, and therefore multiple processes, however, is that it’s hard to keep the app state consistent between them. For example, if we have a task that is selected in the main window, and we open the smart command bar, that task should be selected in the smart command bar as well.
We, therefore, need a way to share data between two or more windows. Once the data has been passed to all windows, we can use it according to our needs. For example, when using Redux, we can dispatch the received data in the store of the window.
State management in an Electron app, within each window, works just as in any other web application. For this reason, we will focus here specifically on the cross windows’ data sharing problem. Once data is consistent across windows, we can manage it as we would in a regular web app.
In designing our solution to this problem, we have identified two alternative solutions, plus a third one that we have only recently started testing. We believe that each of these solutions might be helpful for others, so we have decided to share our findings.
The three solutions that we will discuss are:
- Sharing data between windows via the
BroadcastChannelAPI: this is the one we use, so we will discuss it first; - Sharing data between windows via the Electron IPC mechanism: this is an option we have evaluated, but we haven’t adopted it (reasons explained below);
- Sharing data between windows via
ObservablesonIndexedDBthanks to Dexie.js: this is the new option we have started testing, and it looks very promising for some use cases.
For sake of simplicity, in the following paragraphs, we will share a simplified version of our code. This should make the code easier to understand, and quicker to reuse in other projects. Also, we use TypeScript, for simplicity we have removed all type annotations.
Learn more: Our Product Development Process
Sharing data between windows via broadcast events
Sharing data with the BroadcastChannel is a great option, and it’s also the most straightforward one.
Essentially, this solution leverages the BroadcastChannel API, which is a way to communicate between different documents (in different windows, tabs, frames, or iframes) of the same origin (see BroadcastChannel. Because Electron windows are essentially web pages and are of the same origin, we can use the BroadcastChannel API to communicate between them.
Nothing special, just a simple BroadcastChannel API.
To send data:
sendDataToWindows(data){
  const channel = new BroadcastChannel('akiflow-channel');
  channel.postMessage(data);
}
To receive data:
receiveDataFromWindows(){
  const channel = new BroadcastChannel('akiflow-channel');
  channel.onmessage = (event) => {
    // console.log(event.data)
    // do something with the data
    // For example, if using Redux, dispatch the received data in the store of the window
  };
}
That’s pretty much it.
Note that, because onmessage is a property of the BroadcastChannel object, it can only have one listener. If you need more, you can use the addEventListener method:
channel.addEventListener('message', (event) => {
  // same as above
});
One caveat is that «Messages are broadcasted via a message event fired at all BroadcastChannel objects listening to the channel» (docs).
Depending on your use case, you might want to filter out messages sent by the listening window itself, or not. This can be achieved through different strategies, for example by passing as data an Object with a sender property:
const payload: {
  sender: ...
  data: ..
}
Note that you can’t rely on the origin property of the event object. That will simply read file://.
For our use case, this method has proven to be the most efficient and straightforward. As we want to replicate the data in all windows, we can simply pass the data as is.
For other use cases, however, for example, if you only have two windows, sharing data between windows via the Electron IPC mechanism might be an option.
Sharing data between windows via the Electron IPC mechanism
Sharing the app state between windows via the Electron IPC mechanism is slightly less straightforward.
The IPC mechanism allows a single process to communicate with another process. In our case, for example, we could use it to share the app state between the main window and the smart command bar window.
When using IPC, we need to know the id of each window to which we want to send data. So we first need a way to identify the render processes.
To do so, in the main process we can store a reference to each window on a global variable:
global.windows.mainWin = new BrowserWindow( /* configOptions */);
global.windows.smartCommandBarWin = new BrowserWindow( /* configOptions */);
global.windows.trayWin = new BrowserWindow( /* configOptions */);
global.windows.backgroundWin = new BrowserWindow( /* configOptions */);
We now need to share the windows ids with all render processes. As we are using IPC anyways, we can send them using IPC itself:
To send data from the main process to the render processes, we can use the asynchronous method webContents.send (there’s also a synchronous version, webContents.sendSync):
const windIds = {
  mainWin: global.windows.mainWin.webContents.id
  ...
}

sendFromMainProcessToWindow(channel, windId, data, responseChannel) {
  windows[windId].webContents.send('windIdsInfos', windIds);
}
In the render processes we can now listen for this data. As we expect data only once on this channel, we can use ipcRenderer.once:
// Listen to a single event on the channel
electron.ipcRenderer.once('windIdsInfos', (event, data) => {
  // Do something with the data
});
To share data between windows, from a render process we can now send a message to another window using sendTo
/**
 * @param winIdSender: AkiflowWindows - The window sending the message.
 * @param winIdReceiver: AkiflowWindows - The window to send the message to.
 * @param channel: string - The channel to send the message to.
 * @param data: any - The data to send.
 */
sendFromWindowToWindow(winIdSender, winIdReceiver, channel, data, responseChannel) {
  electron.ipcRenderer.sendTo(winIdReceiver, channel, { sender: winIdSender, data, responseChannel });
}
There are a few things to note.
- We want to identify the window sending the message. We do this by passing the
winIdSenderparameter. This is useful to send a response message. For example, if we are fetching some external APIs from the background window, and we want to send the response to the main window, we can do so by passing thewinIdSenderparameter. - The
channelis required by the Electron IPC mechanism. As outlined in the docs, «the receiving renderer process can handle the message by listening tochannelwith theipcRenderermodule». - The
datais the data to send. We can package it in anObject, so we can pass other data as well. Be aware that «prototype chains will not be included», and that «sending non-standard JavaScript types such as DOM objects or special Electron objects will throw an exception».
Then, on each render process, we can listen to the channel using ipcRenderer.on:
// Listen to multiple events on the channel
electron.ipcRenderer.on(channel, (event, data) => {
  // Do something with the data
  // For example, if using Redux, dispatch the received data in the store of the window
});
Should we want to send the data to the main process, we can use the send method:
// In this case we don't need to pass the `winIdReceiver` parameter.
sendFromWindowToMain(winIdSender, channel, data, responseChannel) {
  electron.ipcRenderer.send(channel, { sender: winIdSender, data, responseChannel });
}
On the main process we can use:
listenOnMain(channel) {
  electron.ipcMain.on(channel, (ev, payload) => {
    // Do something with the data
  })
}
This process works very well when sharing data between two windows. However, it’s not very efficient. For example, if we have a lot of windows, we will have to send the data to all of them. That’s why we have preferred the first method for our use case.
Sharing data between windows via Observables on IndexedDB
Finally, we can use Observables on IndexedDB to share data between windows.
Implementing this from scratch would be somewhat of a chore, but luckily we can use the excellent library Dexie.js.
Since version 3.2, Dexie supports Live Queries. As explained in Dexie’s docs, the liveQuery() method «turns a Promise-returning function that queries Dexie into an Observable».
This is great news for Electron apps that use IndexedDB as their storage solution. We can now use Observables to keep data in sync between windows.
To do so, first, we need to ensure that we are sharing the same IndexedDB instance across all windows. According to the docs, «if partition starts with persist:, the page will use a persistent session available to all pages in the app with the same partition». In short, to achieve this we simply need to add the persist: parameter to the partition property of webPreferences of the BrowserWindow config object.
new BrowserWindow({
  ..
  webPreferences: {
    ...
    partition: 'persist:default' // note that this must be the same exact string in all windows config options
  }
})
Now we have the same IndexedDB instance in all windows.
To turn our queries into Observables, we then simply need to use the liveQuery() method.
Because the official docs explain very well how to use Dexie, we will discuss here only the main steps to follow to use Observables on IndexedDB. The official docs have tutorials on how to use Live Queries with React, Angular, Vue and Svelte, so we will not repeat them here, we will use vanilla JS instead.
First let’s create the database:
// This must be the same in all renderer windows
const db = new Dexie('AkiflowDatabase')
db.version(1).stores({
  tasks: '++id, date, done'
})
Now we can create the Observable with liveQuery():
function listenToDb () {
  const dexieObservable = Dexie.liveQuery(async () => {
    return await db.tasks.where("done").above(0).toArray()
  })

  dexieObservable.subscribe({
    next (newDataFromSharedDb) {
      // console.log('LiveQuery has new data')
      // console.log(newDataFromSharedDb)
    },
    error (err) { console.error('something wrong occurred: ' + err) },
    complete () { console.log('done') }
  })
}
This is incredibly simple. We just need to create a liveQuery() function that returns a Observable that will emit changes of the data stored in IndexedDB.
Now every time we update the database in any window, all other windows will be notified, and the Observable will emit the new data. From there, it’s up to us to react to the data.
In our initial tests, this method can work very well for updating the UI, for example, when we have a list of tasks, and we want to update the UI when a task is marked as done. It’s not so efficient, though, for anything that would normally reside only in memory. For these cases, in our use case, it makes more sense to use the first method listed above.
Check our latest release: New Release: Share Availability, Bookable Links & More!